
Craft Accessories, Craft Store, Crafts and Gifts, Wooden Animal Shapes
Easy Ways to Decorate Wooden Shapes – Don’t Be Afraid of the Blank!
Sep
Decorate Wooden Shapes! Don’t Be Afraid of the Blank!
- Why Wooden Shapes Are So Much Fun to Decorate!
Have you ever looked at a blank wooden shape and thought, “That’s cute… but what would I do with it?”
- You’re not alone!
A lot of people love the idea of decorating wooden shapes, but then they imagine that they need to be able to draw, paint like an artist, or come up with some complicated design.
- You don’t!
Blank wooden shapes are meant to be a starting point for your creativity – not an art test. You don’t need to be able to draw a perfect dog or cat, paint a realistic owl, or create a fancy butterfly.
In fact, some of the most fun projects start with something incredibly simple.
You Don’t Have to Be an Artist
Think of your wooden shape as a blank canvas.
It could become a colourful decoration, a funny animal, a personalised sign, a child’s craft project, a gift, or something completely different.
There really isn’t a wrong way to decorate it.
- Paint the whole thing one colour.
- Glue something onto it.
- Cover it with paper.
- Add stickers.
- Give it giant googly eyes.
- Cover it in rhinestones.
- Write a name on it.
- Or combine several of these ideas!
The blank shape does the hard part for you. The basic outline is already there, so you don’t have to draw it yourself.
The Easiest Animal Ever
Let’s say you’ve chosen a wooden dog.
- You don’t need to draw a dog face.
- Paint the body one colour and let it dry. Then glue on two googly eyes and use a button for the nose.
- Add a simple curved line for the mouth with a marker or paint pen.
- That’s it!
- Suddenly, you have a dog.
- And the great thing about this method is that it doesn’t have to be perfect. In fact, a slightly silly expression can make your finished dog even more charming.
The same idea works for cats, bears and many other animal shapes.
Try Decoupage to Decorate Wooden Shapes
Decoupage is another wonderful way to decorate a blank wooden shape without needing to draw anything.
- Use scrapbook paper, pretty napkins, wrapping paper, tissue paper, magazine pages, maps or other lightweight decorative papers.
- You can cover the entire shape or just cover part of it.
- Imagine a butterfly covered in colourful scrapbook paper, an owl made with pages from an old book, or a cat covered in a cheerful floral print.
- You can even combine painted areas with paper-covered areas.
Stickers Are Your Friend
Stickers make decorating almost ridiculously easy.
- Use regular stickers, foam stickers, alphabet stickers, seasonal stickers or whatever you happen to have in your craft supplies.
- Kids especially love this method.
- A plain wooden shape can become a colourful afternoon craft project with nothing more than paint, stickers and a little imagination.
- And don’t worry about whether the stickers are arranged “correctly.”
There is no correct arrangement!
Paint It One Colour
Here’s another secret:
- You don’t have to paint every little detail.
- A solid colour can look fantastic.
- Try a classic black cat, a golden yellow butterfly, a white owl or a bright blue bear.
- You can stop right there, or add just a few details.
- A few dots.
- Some stripes.
- A simple heart.
- A name.
- A couple of googly eyes.
- Sometimes simple really is better.
Paint Pens Make It Even Easier
If brushes make you nervous, try paint pens or paint markers.
They’re great for adding:
- Dots
- Lines
- Names
- Simple patterns
- Stars
- Hearts
- Flowers
- Swirls
- Borders
- Facial features
You don’t have to create complicated artwork. Even a collection of dots can turn a plain shape into something special.
Try using the end of a paintbrush, cotton swab or dotting tool to make perfectly imperfect polka dots
- Get Out the Buttons
- Buttons are fantastic for decorating wooden shapes.
- Use a button for a nose.
- Use small buttons for eyes.
- Make a row of buttons down the centre of a butterfly.
- Add colourful buttons to a bear.
- Or simply glue buttons wherever you think they look good.
- You can also combine buttons with ribbon, yarn, felt, fabric or paper.
- Use different colours, sizes and shapes as well as decorated buttons
Rhinestones, Sequins and Sparkle
If you like sparkle, go for it!
- Rhinestones, sequins, glitter glue and metallic papers can turn a simple wooden shape into something completely different.
- If you have silver, gold, copper or other colour Foil Flakes, they can also be added with glue.
- A butterfly covered in rhinestones would make a fun decoration.
- A sparkly owl could become a bedroom decoration.
- And a little glitter on smaller or larger pieces, can make almost any project feel special.
Try a Collage
Don’t want to paint?
Make a collage instead.
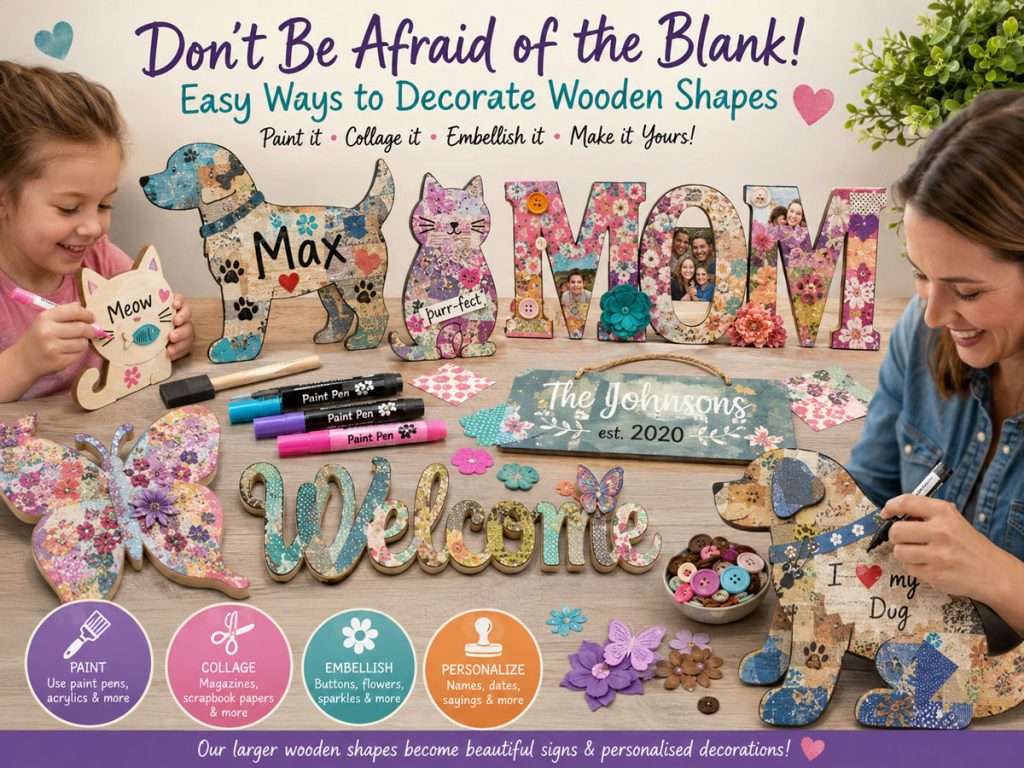
- Cut out pictures, patterns, words, letters or interesting shapes from magazines and scrapbook papers and arrange them on your wooden blank.
- You can make a completely random collage or choose a theme.
For example:
- Butterfly: flowers, leaves and colourful paper.
- Dog: paw prints, bones and the dog’s name.
- Cat: fish, hearts and little phrases.
- MOM: family photos, flowers, favourite colours and meaningful words.
- DAD: favourite colours, hobbies, sports, tools or other things that remind you of Dad.
Stamps and Transfers
- Rub-on transfers, clear stamps and rubber stamps are another great way to decorate without having to draw.
- You can also use Temporary Tattoos, which can make surprisingly fun decorations
- Stamp flowers, stars, dots, words or other patterns onto your shape.
- Transfers:
- Use special printable Iron-On Transfer Paper to print designs on your inkjet or laser printer and then press them onto unfinished wood with a household iron.
- You can also paint the shape first and add stamps or transfers once the paint is dry.
Sponges
Don’t underestimate the humble sponge! It can turn a plain wooden shape into something colourful and interesting without requiring a steady painting hand. Dab on one colour, try several colours, or layer different shades to create texture and fun patterns. A sponge is also great for making clouds, dots, backgrounds and soft, blended effects. Use some shaped sponges if you have some in your stash. If not, just dab, dab, dab – and see what happens! There really is no need to worry about making every little mark perfect.
Stencils
Want your wooden shape to look fancy without having to draw a fancy design? That’s where stencils come to the rescue! Place a stencil on your shape, dab or brush on some paint (follow easy instructions in our blog), carefully lift the stencil away, and – voilà! – you have a design. Try flowers, stars, hearts, letters, numbers or simple patterns. You can even layer different stencils or use several colours. It’s almost like having a little bit of artistic help built right into your craft supplies!
Don’t Forget Adhesive Shelf Paper
Here’s an easy idea you might already have around the house.
- Decorative adhesive shelf paper can be cut into simple shapes and stuck directly onto your wooden blank.
- Cut out circles, stripes, hearts, leaves or other shapes.
- You can even use paper punches to create lots of small decorative pieces.
It’s an easy way to create patterns without having to paint them.
Let the Kids Have Fun
- Wooden shapes are also wonderful children’s craft projects.
- Give children some washable or craft-safe supplies, stickers, googly eyes, buttons, paper shapes and paint, and let them make their own creations. (Parental supervision necessary if children are very young.)
- They might make a dog that looks nothing like a real dog.
- Perfect!
- They might put the eyes in funny places.
- Even better.
- They might cover their bear in stickers, give their owl six colours and put a giant button on its nose.
- That’s the fun of it.
- The goal isn’t perfection. The goal is creativity.
- Always choose age-appropriate materials and supervise children when using small parts, adhesives or other craft supplies.
Make It Personal
Our larger wooden shapes can also become signs and personalised decorations.
- Add a family name.
- A child’s name.
- A pet’s name.
- A welcome message.
- A favourite saying.
- A birth year.
- A seasonal greeting.
- Or simply decorate the shape in colours that match your home.
- A MOM or DAD sign can be personalised with favourite colours, photos, scrapbook paper, buttons, flowers or other meaningful embellishments.
And Here’s the Best Part…
- You don’t have to know what your finished project will look like when you start.
- That’s the whole point of a blank.
- Start with one idea.
- Paint it.
- Add something.
- Look at it.
- Add something else.
- Change your mind.
- Cover it with paper.
- Add some dots.
- Glue on a pair of googly eyes.
- There are no art-school rules here.
- Your wooden shape doesn’t have to look like anyone else’s.
- It just has to be yours.
Ready to Give It a Try?
- Choose a wooden dog, cat, bear, owl, butterfly, MOM, DAD or another blank shape and see where your imagination takes you.
- You can keep it simple with one colour and a few details, or go all-out with paper, stickers, buttons, rhinestones and embellishments.
- If the wood blank is small, paint or decorate it and then glue a small magnet on the back of the shape. Now you have a fridge magnet for yourself or to give as a gift.
You don’t need to be able to draw. You don’t need to be an artist. You just need a blank shape and a few things you already have in your craft supplies.
- So don’t be afraid of the blank.
The blank isn’t the finished project – it’s where your project begins!
Keep Creating!
- Ready to start your next creative project? Visit our Craft Store and discover a variety of unique stencils and fun craft accessories to help bring your ideas to life.
- Looking for a little more inspiration? Take a look through our blog, where you’ll find more ideas, projects and creative inspiration to explore.
- And if you love the idea of giving something handmade but don’t have the time to make it yourself, don’t worry! Our gifts collection has ready-to-give ideas for a variety of occasions.
- Whether you’re in the mood to create something yourself or looking for a special gift, there’s always something fun to discover at The Craft Corner.