
Canadian Made Gifts, Craft Accessories, Craft Store, Crafts and Gifts
Pressed Dried Flowers: How to Press Them & Creative Craft Ideas
Oct
Pressed Dried Flowers & Creative DIY Craft Ideas
Pressed dried flowers have a delicate, natural beauty that can turn simple craft projects into something truly special. Their pretty colours, interesting shapes and delicate petals can be used to create everything from framed artwork and decorative glass to bookmarks, suncatchers, wooden decorations, canvases and handmade gifts.
You can purchase flowers that have already been pressed and dried, which is convenient but can be more expensive, or you can press your own flowers at home. Once you have a collection of pressed flowers and leaves, there are so many creative possibilities.
Whether you’re crafting for yourself, making a thoughtful gift or looking for a fun project to enjoy with children, pressed flowers are wonderfully versatile.
Take a look at the YouTube videos at the end of this blog for easy and exciting ideas and instructions for crafting with pressed dried flowers.
Buy Pressed Dried Flowers or Press Your Own?
Buying pressed and dried flowers is an easy way to get started, particularly if you’re looking for specific colours, flower varieties or shapes.
However, pressing your own flowers can be inexpensive and surprisingly easy. Flowers from your garden, small flowers from a bouquet, leaves, ferns and some wildflowers can all provide beautiful materials for crafting.
How to Press Flowers in a Heavy Book
The traditional book method requires very little equipment and is ideal for small, relatively flat flowers, petals and leaves.
You’ll need:
* Fresh flowers and leaves
* Paper towels, blotting paper or other absorbent paper
* A heavy book
* Additional books or another heavy object
Place each flower between sheets of absorbent paper and carefully close the book. Place additional weight on top and leave the flowers undisturbed for one to several weeks, checking them occasionally.
The drying time will depend on the type and thickness of the flower.
A useful tip is to avoid placing very damp flowers directly against valuable books, as moisture can damage the pages. The absorbent paper helps protect both the flowers and the book.
How to Press Flowers in the Microwave
If you don’t want to wait several weeks, a microwave flower press can speed up the process considerably.
Flowers are placed between absorbent materials and pressed flat before being heated in short intervals. Allow the flowers to cool between intervals and check them frequently, as flowers can scorch quickly.
The exact time will depend on the flowers and the equipment being used, so always follow the instructions supplied with a commercial microwave flower press.
Never leave the microwave unattended while pressing flowers.
What Flowers Are Best for Pressing?
Thin, relatively flat flowers tend to work particularly well because they flatten easily.
Some flowers and plants to try include:
* Daisies
* Pansies
* Violas
* Forget-me-nots
* Queen Anne’s lace
* Ferns
* Clover
* Baby’s breath
* Small wildflowers
* Small leaves
* Individual petals
* Herbs with interesting leaves
* Small garden flowers
Larger, thicker flowers can also be used, although you may find it easier to separate them into petals or sections before pressing.
Don’t be afraid to experiment with leaves, grasses, stems and other interesting pieces of nature. Even slight changes in colour during drying can add to the character of your finished design.
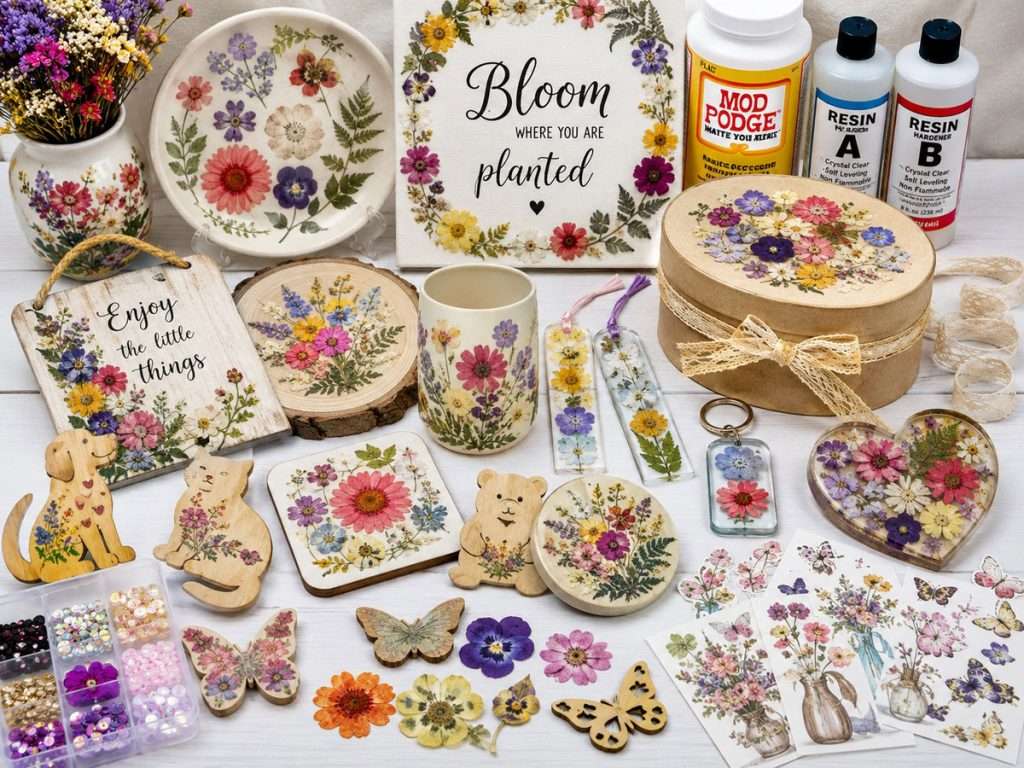
What Can You Make with Pressed Dried Flowers?
This is where the fun really begins!
Pressed flowers can be used in projects large and small, and you can combine them with other craft materials to create something completely unique.
Glass and Pressed Flowers
Glass makes a beautiful background for pressed flowers because it allows their delicate shapes and colours to remain visible.
Ideas include:
* Glass frames
* Glass ornaments
* Glass dishes
* Glass coasters
* Glass magnets
* Decorative jars
* Vases
* Candle holders
* Suncatchers
For indoor projects, a suitable decoupage medium can be used to attach and seal pressed flowers to appropriate glass and acrylic surfaces.
- Always check whether the product you are using is suitable for the surface and intended use. Ordinary decoupage products are not necessarily waterproof, so take particular care with items that may come into contact with water.
Decorating Acrylic with Pressed Flowers
Clear acrylic is another wonderful surface for pressed flowers.
You can find acrylic blanks in many shapes and sizes, including:
* Hearts
* Circles
* Stars
* Butterflies
* Snowflakes
* Christmas ornaments
* Bookmarks
* Coasters
* Suncatchers
* Keychains
* Larger acrylic pieces
Arrange your flowers before applying any adhesive. You may even want to take a photograph of your arrangement so you have a reference to follow.
Tweezers are helpful for positioning delicate flowers without damaging the petals.
What Glue Should You Use for Pressed Flowers?
For many indoor pressed-flower projects, a good-quality decoupage medium is a convenient choice. It can be used to attach and, depending on the product, seal pressed flowers on surfaces such as paper, canvas, wood, glass and acrylic.
Choose a finish that suits your project, such as matte, satin or gloss, and always check that the product is suitable for the surface you are decorating. if have mod podge, you can use that for your project.
When working with delicate flowers, less is often better. Too much liquid adhesive can make petals look wet, translucent or cause them to curl.
A simple approach is to:
* Arrange your flowers before glueing.
* Apply a small amount of adhesive to the surface.
* Use tweezers to carefully position each flower.
* Gently press the flower into place.
* Allow it to dry completely.
* Add a thin protective coat if appropriate for your project.
It is a good idea to test your adhesive on a spare flower first, particularly when working with very delicate petals.
A Tip for Framing Pressed Flowers
If you’re planning to place your finished artwork inside a conventional picture frame, remember to consider the thickness of your flowers.
Very bulky flowers may press against the glass, break or prevent the frame from closing properly. Flat flowers, individual petals and leaves are often a better choice for framed projects.
You can create a beautiful design using small flowers without covering the entire background. A little space between the flowers can make the arrangement look light and elegant.
Pressed Flower Suncatchers
Pressed flowers are perfect for suncatchers because their delicate petals can look beautiful when the light shines through them.
You can use:
* Clear acrylic or suitable clear craft blanks
* Pressed flowers
* Decoupage medium or another suitable adhesive
* A fine paintbrush
* Tweezers
* Ribbon or cord
* Optional beads or other embellishments
Arrange the flowers into a design you like, attach them carefully and allow the project to dry completely before hanging it in a sunny window.
Pressed Flower Bookmarks
Bookmarks are simple to make and wonderful as handmade gifts.
You can use a clear acrylic bookmark blank, or make a bookmark from cardstock.
For a simple paper bookmark:
* Cut cardstock to the desired size.
* Arrange your pressed flowers.
* Attach them with a small amount of suitable adhesive.
* Allow the flowers to dry completely.
* Add a protective coating if desired.
* Punch a hole at the top and add ribbon or a tassel.
For a no-resin option, place the flowers between two pieces of clear self-adhesive film or use a suitable laminating sheet. This is also a fun option for children.
Make sure the flowers are completely dry before enclosing them.
Pressed Flower Phone Cases
A clear phone case can become a miniature piece of botanical artwork.
Choose very flat flowers and leaves and arrange them on the back of the case. Keep the flowers away from the edges where possible, and make sure everything is completely dry before using the case.
Because phone cases are handled frequently, this project may experience more wear than a decorative piece of artwork. Test your adhesive and protective finish first.
Pressed Flowers on Wood
Wood provides a lovely rustic background for pressed flowers.
Try decorating:
* Wood slices
* Wooden hearts
* Wooden butterflies
* Wooden animals
* Stars
* Christmas shapes
* Wooden letters
* Shelf sitters
* Desk decorations
* Signs
* Plaques
* Small boxes
You can paint the wood first with acrylic paint. Soft shades such as white, cream, pale pink or light blue can make colourful pressed flowers stand out beautifully.
Once the paint is completely dry, arrange your flowers and attach them with a suitable adhesive.
Painted Wood and Pressed Flowers
Paint and pressed flowers work beautifully together.
Imagine a wooden butterfly painted in a soft colour with tiny pressed flowers forming its wings, or a wooden animal decorated with pressed leaves to create a miniature woodland scene.
You can also combine painted backgrounds with pressed flowers, floral stickers and other small embellishments. The flowers don’t have to be the only decorative element.
Papier-Mâché Gift Boxes
Pressed flowers can transform a simple papier-mâché gift box into something beautiful.
Paint the box first, then decorate the lid with:
* Pressed flowers and leaves
* Floral stickers
* Butterflies
* Small paper embellishments
* Metallic accents
* Hand-painted details
A floral gift box would make a lovely handmade gift for a birthday, Mother’s Day, wedding or Christmas.
Pressed Flowers on Canvas
Canvas and canvas boards are wonderful for larger pressed-flower projects.
You could create:
* A botanical bouquet
* A floral heart
* A botanical initial
* A miniature meadow scene
* A favourite saying surrounded by flowers
A Large UV DTF Inspirational Saying
Place a large UV DTF inspirational saying in the centre of a canvas, then surround it with a colourful arrangement of pressed flowers and delicate leaves. Keep the design simple and let the flowers create a pretty botanical border around the saying. Choose any saying, colours and flower combination that inspires you.
This could make a lovely handmade gift, too. Simply choose a saying that suits the person you’re creating it for and select pressed flowers in their favourite colours.
Can You Use Epoxy Resin with Pressed Flowers?
Yes, pressed flowers can be used with epoxy resin to create beautiful, glossy projects such as:
* Bookmarks
* Coasters
* Keychains
* Jewellery
* Pendants
* Trinket dishes
* Ornaments
* Paperweights
* Decorative moulds
* Small trays
Flowers must be completely dry before being enclosed in resin. Always follow the manufacturer’s instructions for mixing, curing, ventilation and protective equipment.
If you’re looking for a project without resin, there are plenty of alternatives.
What Can You Use Instead of Resin?
For many indoor pressed-flower projects, resin isn’t necessary.
Depending on the project, you can use:
* Decoupage medium for attaching and sealing flowers
* A suitable clear acrylic sealer
* Self-adhesive laminating sheets
* Clear adhesive film
* Glass, with the flowers displayed behind it
Laminating sheets and clear adhesive film are particularly useful for bookmarks, cards and other flat projects. For framed botanical artwork, simply placing the flowers behind glass can be a beautiful way to display them without coating the flowers at all.
Mix Pressed Flowers with Floral Stickers
You don’t have to use pressed flowers for every part of your design.
Combining real pressed flowers with floral stickers can add colour and variety while giving you more creative freedom.
Try combining:
* Pressed flowers
* Pressed leaves
* Floral stickers
* Butterfly stickers
* Painted stems
* Small paper embellishments
This can be particularly helpful when you want to add a colour or flower shape that isn’t available in your pressed-flower collection.
Pressed Flower Crafts for Kids
Pressed flowers can be a wonderful way for children to explore nature and creativity.
Pressed Flower Greeting Cards
Supplies:
* Cardstock or blank cards
* Pressed flowers
* Suitable glue or decoupage medium
* Paintbrush
* Tweezers
* Markers
Children can arrange the flowers into a little bouquet, garden or butterfly and add their own handwritten message.
Flower Garden Collage
Supplies:
* Cardstock
* Pressed flowers and leaves
* Floral stickers
* Glue
* Markers or crayons
Draw stems and grass, then let the children create their own flower garden using a combination of real and decorative flowers.
Pressed Flower Bookmarks
Supplies:
* Cardstock
* Pressed flowers
* Clear adhesive film or laminating sheets
* Ribbon
* Hole punch
Arrange the flowers on the cardstock, cover the design with the clear film or laminate and trim the bookmark. Punch a hole at the top and add a ribbon.
Flower Butterflies
Draw or cut out a butterfly shape and let the children decorate it with small flowers and leaves.
Use markers or paint for the body and add stickers or other embellishments for extra colour.
Pressed Flower Initials
Draw a large initial on cardstock and fill it with pressed flowers and leaves.
This is a simple project that can be personalised with a child’s favourite colours and flowers, and the finished artwork can be framed.
More Pressed Flower Craft Ideas
Once you start collecting pressed flowers, you’ll probably begin to see possibilities everywhere!
Try decorating:
* Acrylic Christmas ornaments
* Fridge magnets
* Wooden or Acrylic Keychains
* Gift tags
* Decorative trays for display
* Wooden shelf sitters
* Wooden signs
* Photo frames
* Small boxes
A Few Tips for Working with Pressed Flowers
Pressed flowers are delicate, so a little care goes a long way.
* Use tweezers when positioning small or fragile flowers.
* Arrange your design before applying adhesive.
* Take a photograph of your arrangement so you have a reference to follow.
* Use as little adhesive as possible.
* Make sure flowers are completely dry before sealing or enclosing them.
* Test your adhesive or sealer on a spare flower before starting an important project.
* For framed artwork, choose flowers that are flat enough to fit comfortably between the backing and glass.
* Store unused pressed flowers somewhere dry and protected from moisture.
The Beauty of Pressed Flowers
One of the loveliest things about pressed-flower crafts is that they don’t have to be perfect.
A slightly imperfect petal, an unusual leaf or a flower that has changed colour during drying can make your finished creation even more interesting and unique.
You can preserve flowers from a special bouquet, use flowers from your garden, collect leaves and wildflowers or simply purchase a selection of pressed flowers and start experimenting.
From a tiny bookmark to a large canvas, pressed dried flowers offer endless opportunities for creativity.
Once you start pressing flowers, you may find that you’re no longer looking at a garden simply as a garden – you’ll be looking at it as a collection of potential craft supplies!
Keep Creating!
Ready to start your next creative project or looking for something special? Visit our Craft Store and discover a variety of unique products, craft supplies, accessories and more to inspire your creativity.
Looking for a little more inspiration? Take a look through our blog, where you’ll find ideas, projects and creative inspiration to explore.
And if you’re looking for something special to give, our gifts collection has thoughtful, ready-to-give ideas for a variety of occasions.
Whether you’re looking for something to create with, something beautiful to enjoy, or a special gift, there’s always something fun to discover at The Craft Corner.
See theYouTube Videos below: