
ceramic bisque pendants, Crafts and Gifts
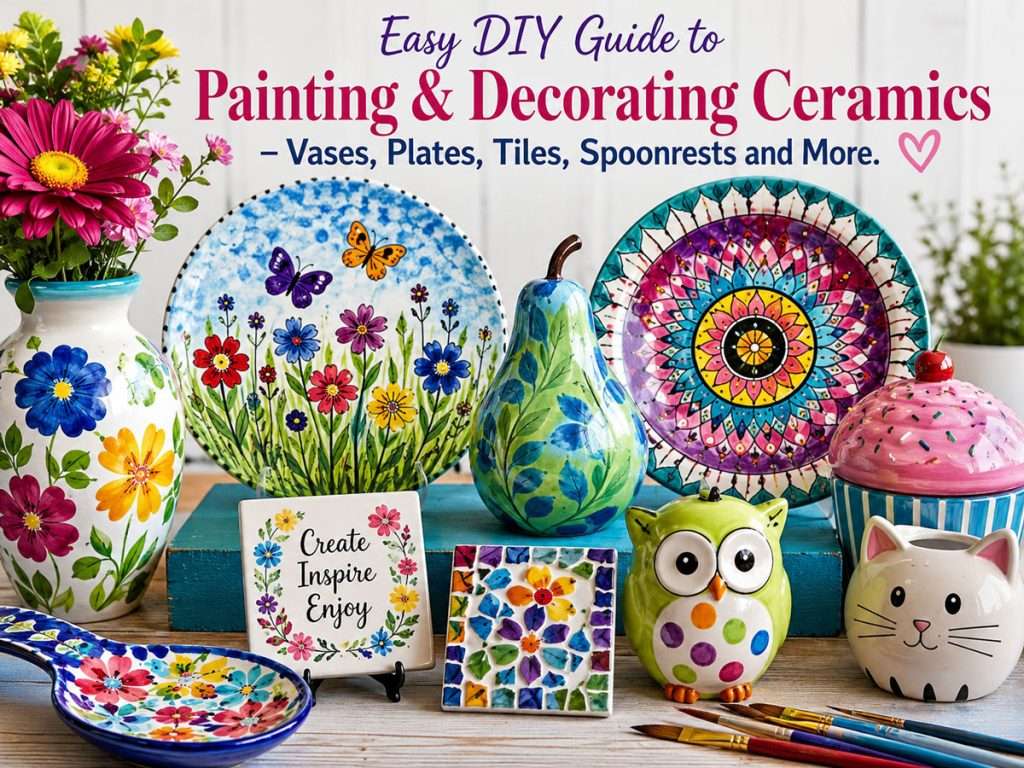
Easy DIY Guide to Painting & Decorating Ceramics
Sep
Painting & Decorating Ceramics – Vases, Plates, Tiles, Spoonrests and More
There’s something incredibly satisfying about turning a simple ceramic piece into a one-of-a-kind decorative accent. Medium-sized shaped ceramic vases, large, saucer-sized plates – all shapes and sizes – and ceramic tiles are examples of perfect blank canvases for creative DIY projects. When painting & decorating ceramics – whether you’re styling a vase with faux florals, creating decorative wall tiles, or designing charming little trinket plates, here’s how to do it safely and beautifully.
Creative DIY Ideas
Painting and Decorating Ceramic Vases
Perfect for faux flowers, dried stems, or as standalone décor pieces.
Design Ideas:
- Modern minimalist line art in black or gold
- Textured “stone” effect with layered neutral paints
- Boho-inspired patterns with terracotta and cream tones
- Metallic accents around the rim
- Hand-lettered quotes
👉 TIP: If you are using the vase for faux or dried flowers only, you don’t need to waterproof the inside.
Small Round Plates (Saucer Size) – DIY Ceramic Plate Art
- These are ideal for decorative use only.
Use Them As:
- Ring or jewellery dishes
- Decorative Wall Art
- Candle holders
- Design Ideas:
- Floral motifs
- Mandala patterns
- Abstract colour blocking
- Personalised names or monograms
⚠️ Important: These pieces should be considered decorative only. A topcoat can improve durability, but it does not automatically make the finished piece food-safe or dishwasher-safe.
Ceramic Tiles – DIY Ceramic Tile Art
Great for:
- Coasters (add felt pads or cork underneath)
- Decorative wall art
- Backsplash accents
- Plant pot bases
Design Ideas:
- Alcohol ink marbling
- Stenciled patterns
- Hand-painted botanicals
- Faux encaustic tile designs (They “mimic the look of traditional patterned cement tiles using easier-to-maintain materials”)
- Decoupage with napkins, rice or other paper
YouTube: Painting with Enamel Paints
🎨 What Paints Can You Use?
Not all paints are created equal. Here are safe and practical options:
1️⃣ Acrylic Craft Paint
- Easy to use
- Water-based
- Great for decorative pieces
- Must be sealed
- Not waterproof or food-safe on its own
Best for: Vases used for faux flowers, tiles, decorative plates.
2️⃣ Multi-Surface Acrylic Paint
- Brands like FolkArt Multi-Surface or similar are designed for ceramics and may be suitable for oven curing, depending on the specific product. Always follow the manufacturer’s curing instructions and make sure the ceramic piece itself is suitable for oven use.
- Best for: Decorative pieces and, where the specific paint manufacturer’s instructions permit, some functional items that can be gently hand washed.
3️⃣ Acrylic Enamel Paint (Specifically for Glass & Ceramic)
- These are formulated to adhere better to slick surfaces and some are designed to be oven-cured. Always follow the instructions for the specific product.
- Best for: Durable ceramic decorative pieces – depending on the product and the ceramic surface.
4️⃣ Oil-Based Enamel Paint
- Very durable but has strong fumes and longer cure times. Not ideal for indoor DIY without ventilation.
5️⃣ Ceramic Glazes (Kiln-Fired)
True food-safe finishes require kiln firing – not a home oven. This is professional-level ceramic glazing. (Note: Use Craft ceramics for decorative purposes only.)
🖌️ Step-by-Step: How to Paint Ceramics Properly
Step 1: Clean Thoroughly
- Wash with warm soapy water
- Let dry completely
- Wipe with rubbing alcohol to remove residue
Step 2: Lightly Sand (Optional but Recommended)
- Use fine grit sandpaper (220-400 grit) to lightly scuff glossy surfaces. Wipe clean afterwards.
Step 3: Apply Thin Coats
- Use soft brushes or foam brushes
- Apply thin, even coats
- Allow proper drying time between coats (usually 1–2 hours)
- Avoid thick paint layers – they may bubble during curing.
🔥 Oven Curing: Important Safety Guidance
⚠️ This applies ONLY to paints labelled as “oven-curable”. Always follow the paint manufacturer’s instructions first. If their instructions differ, the manufacturer usually knows best.
There is no single oven-curing method that applies to all ceramic paints. Follow the exact temperature, curing time and cooling instructions provided by the manufacturer of the paint you are using
Only oven-cure a ceramic piece when both the paint manufacturer’s instructions and the ceramic manufacturer’s instructions specifically permit it. Follow the exact temperature, curing time, oven-start instructions and cooling instructions provided with the product. Do not substitute a general baking temperature or curing time.
Why?
Rapid temperature changes can cause the ceramic to crack or break.
⚠️ Fire & Safety Notes
- Do not use the self-clean cycle.
- Do not bake above the recommended temperature.
- Do not oven-cure pieces with metallic embellishments unless the paint/product manufacturer specifically states that they are suitable for oven curing.
- Ensure good ventilation.
- Never leave the oven unattended while following the manufacturer’s curing instructions, and follow the safety instructions for your particular oven.
- Do not bake pieces with trapped moisture inside.
- If you are unsure about your paints’ oven safety, do NOT bake it.
*****Do not oven-cure or kiln-fire a mass-produced or commercially finished ceramic piece unless the manufacturer specifically states that it is suitable for that process. A finished or glazed surface does not automatically mean that the piece is suitable for additional firing.
How to Seal “Decorative” Ceramics
If you want your piece to be gently hand-washable:
Option 1: Clear Acrylic Sealer (Spray) for Decorative Items – Sealing for Handwashing
- Use a suitable non-yellowing, water-based sealer intended for your particular application.
- Apply 2-3 light coats.
- Allow 24-72 hours for curing before use.
- Best for decorative items.
Option 2: Dishwasher-Safe Mod Podge (Decorative Only)
- Allow it to cure for the time specified by the manufacturer before use.
- If the specific product is labelled dishwasher-safe, follow the manufacturer’s instructions regarding dishwasher use and curing time.
- Still not recommended for food contact.
Important:
- Unless the specific product is expressly rated for the intended use, painted decorative ceramics should be:
- Hand washed only
- Not soaked
- Not scrubbed aggressively
- Not microwaved
- Not used for food unless specifically certified food-safe
Using Your Vase for Faux Flowers
- If your vase is:
- For faux flowers – no interior sealing required.
- For dried florals – interior sealing optional.
- the safest simple option is to use a separate watertight container inside the decorative vase.
- TIP: Simplest option: Insert a glass jar inside your decorative ceramic vase if using real flowers in water.
Decorating Ceramics with Rub-On Transfers
What Are Rub-On Transfers?
Rub-on transfers are decorative images that can be transferred directly onto smooth ceramic surfaces. Once applied, they have no visible paper or vinyl border, giving the design the appearance of hand-painted artwork.
They are a simple and effective way to decorate ceramic items such as vases, flower pots, ornaments, picture frames, jewellery dishes, and other decorative pieces.
Supplies
- Ceramic item
- Rub-on transfer sheet
- Transfer tool, burnishing tool, or craft stick
- Scissors
- Soft, clean cloth
- Acrylic spray sealer
How to Apply Rub-On Transfers
- Clean the ceramic surface thoroughly to remove dust, dirt, grease, and fingerprints. Allow it to dry completely.
- Paint the item first, if desired. Allow the paint to dry and cure completely before applying the transfer.
- Cut out the transfer as close to the design as practical. This makes it easier to position accurately.
- Position the transfer on the ceramic surface according to the manufacturer’s instructions. Secure it lightly if necessary so it does not move.
- Burnish the design. Using the transfer tool or a craft stick, rub firmly over the entire design. Work carefully from the centre outward and make sure you cover all areas.
- Peel away the backing slowly. Check as you go to make sure the entire design has transferred. If any part has not transferred, carefully place the backing back down and burnish that area again.
- Seal the finished design. Once the transfer is fully adhered, protect it with a suitable sealer, if recommended by the transfer manufacturer, allowing each coat to dry according to the manufacturer’s instructions.
TIPS
- Apply rub-on transfers only to smooth, clean, dry surfaces for the best results.
- Avoid applying them over heavily textured or rough ceramic surfaces.
- Burnish from the centre outward to help prevent bubbles and ensure good adhesion.
- Handle the transfer carefully before sealing, as rubbing or scratching the design may damage it.
- Apply several thin coats of sealer rather than one heavy coat to help prevent running, pooling, or uneven coverage.
- Always check the transfer and sealer manufacturer’s instructions for compatibility and recommended uses.
- For items that will come into contact with food, water, or frequent washing, make sure the products you use are specifically rated for that purpose.
****A general acrylic sealer should not automatically be considered food-safe or dishwasher-safe.
Decorating Ceramics with Waterslide Decals
What Are Waterslide Decals?
Waterslide decals are printed designs that slide from a paper backing onto a ceramic surface after soaking in water. The thin film creates a smooth, professional-looking finish. Choose the correct Waterslide Paper depending on whether you are using a Laser printer or Inkjet printer.
Supplies
- Waterslide decal paper – see-through or white
- Inkjet or laser printer
- Clear acrylic spray (for inkjet prints)
- Bowl of warm water
- Ceramic item
- Soft cloth or sponge
- Acrylic sealer
How To Apply
- Print your design and let the ink dry.
- Seal inkjet prints with light coats of a clear acrylic spray suitable for the waterslide paper, following the paper manufacturer’s instructions.
- Cut out the design or designs.
- Soak the decal according to the manufacturer’s instructions; soaking time can vary by product.
- Slide the decal onto the ceramic and position it.
- Smooth out water and air bubbles with a soft cloth.
- Allow to dry for 12–24 hours.
- Apply a clear sealer to protect the finish.
Creative Ideas
- Personalised mugs (decorative use)
- Decorative plates
- Flower pots
- Ornaments
- Trinket dishes
- Ceramic tiles
YouTube Video: How to Decorate Ceramics and Glass with Dried Flowers
YouTube Video: How to Cover Clay Pots with Fabric
Important: The above fun techniques are intended for decorative ceramics only. Standard craft paints, rub-on transfers, and most printable waterslide papers are not food-safe and should not be used on surfaces that come into contact with food or beverages.
Another Trending Technique: Paint Pouring & Dipping on Ceramic
Paint pouring and dipping techniques are especially eye-catching on saucer-sized plates and ceramic tiles. These methods create organic, marbled, and abstract effects that feel modern and artistic.
Paint Pouring on Ceramic Plates & Tiles
- Best For:
-
- Decorative plates (non-food use)
- Wall art tiles
- Coasters
- Statement décor pieces
What You’ll Need:
- Acrylic craft paint or fluid acrylics
- Pouring medium (to thin paint properly)
- Disposable cups
- Gloves
- Drop cloth
Basic Method:
- Clean and dry the ceramic surface thoroughly.
- Mix acrylic paint with pouring medium (follow product ratios).
- Pour layered colours into one cup.
- Slowly pour onto the centre of the plate or tile.
- Tilt surface gently to spread paint.
- Allow to dry flat for 24-48 hours.
- Seal once fully dry.
⚠️ Important: These pieces are decorative only unless sealed with a durable topcoat.
Ceramic Dipping Technique
Dipping creates a bold, modern colour-block effect.
How to Do It:
- Use the paint at the consistency recommended by the manufacturer; only thin it if the product instructions permit it.
- Lay flat to dry. Hold plate or tile firmly.
- Dip one section into paint at an angle.
- Allow excess to drip off.
Great for:
- Half-dipped minimalist designs
- Layered dip effects (allowing full dry time between dips)
- Metallic edge accents after curing
Sealing Poured or Dipped Pieces
- Because poured paint can remain slightly flexible:
- Allow extended dry time (48–72 hours minimum).
- Use a compatible clear sealer suitable for the paint and intended use, following the manufacturer’s instructions.
- For higher durability (decorative only), a clear epoxy resin topcoat creates a glossy, glass-like finish.
Reminder:
These decorative paint techniques should not be considered food-safe. Food-safe ceramic ware requires materials and a firing process specifically designed and tested for food contact; simply sealing a painted surface does not make it food-safe.
Conclusion:
Painting ceramic vases, plates, and tiles is a beautiful way to create personalised décor. With proper paint selection, surface preparation, application, curing, and care, your creations can last for years.
When in doubt:
- Follow the manufacturer’s instructions.
- Keep decorative pieces decorative.
- Avoid food contact unless professionally glazed and kiln-fired.
- Safety first – creativity second – and you’ll have stunning handmade décor you’ll be proud to display.
Keep Creating!
- Ready to start your next creative project? Visit our Craft Store and discover a variety of unique stencils and fun craft accessories to help bring your ideas to life.
- Looking for a little more inspiration? Take a look through our blog, where you’ll find more ideas, projects and creative inspiration to explore.
- And if you love the idea of giving something handmade but don’t have the time to make it yourself, don’t worry! Our gifts collection has ready-to-give ideas for a variety of occasions.
- Whether you’re in the mood to create something yourself or looking for a special gift, there’s always something fun to discover at The Craft Corner.
🛑 Website Disclaimer Section
Important Safety Disclaimer
The information provided in this article is for general educational purposes only. Always follow the manufacturer’s instructions for any paint, sealant, or product used. Oven curing should only be done when the specific paint manufacturer’s instructions state that the product is suitable for oven curing, and the ceramic piece itself is suitable for the process.
We have not independently tested all products mentioned. Results may vary depending on materials and techniques used. Decorative ceramic items created using craft paints, sealers, transfers or similar home methods should not be assumed to be food-safe. Only use ceramic ware for food contact when the materials and process are specifically intended and rated for that purpose.
Use proper ventilation, do not leave ovens unattended, and proceed at your own discretion. We are not responsible for misuse or damage resulting from improper application or curing methods.
****Do not bake or kiln-fire mass-produced decorative craft ceramics, especially if, for example, the inside of a vase has been glazed already.