
Craft Accessories, Crafts and Gifts, Jewellery, Mother's Day, Shell Pendants and Earrings
Happy Mother’s Day MOM DIY Gifts – Easy Creative Ideas
Apr
Happy Mother’s Day MOM DIY Gifts : Easy Creative Ideas for Kids and Adults
Mother’s Day is just around the corner – a perfect opportunity to slow down and create something truly meaningful for someone special in your life. Whether you’re celebrating Mom, Grandma, a mother figure, or someone who has offered care, guidance, and love, these easy and fun ideas are a heartfelt way to say “Happy Mother’s Day.”
Whether you’re crafting with kids or tackling a more detailed project on your own, these projects blend creativity, personalisation, and charm. From decorative signs to wearable art and keepsakes, there’s something here for everyone, whatever your skill level.
Decorative Wooden Signs & Plaques to say “Happy Mother’s Day MOM”:
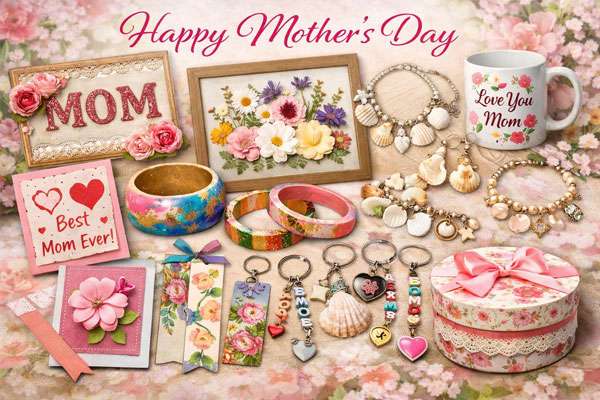
- A simple wooden sign can be transformed into a beautiful keepsake with just a few creative touches. Take a white sign featuring the word “MOM,” then experiment with a foil paint-pour dip to create a marbled, metallic effect around the edges as a frame. Once dry, enhance the letters with paint or glitter, or outline them with rhinestones or pearls. (For step-by-step techniques, see our other blog posts on paint pours and dips.)
- Finish by embellishing the sign with hearts, floral die-cuts, stickers, or soft accents. For a balanced look, concentrate your decorations around the edges or in the corners.
- For a softer, more delicate style, try a wooden plaque painted in light pink chalk paint. Add a stencilled message such as “Best Mom Ever,” and frame it with rose-toned flowers or subtle embellishments for a vintage-inspired finish.
- You can also explore mixed media by layering ribbons, paper flowers, buttons, or lace around a stencilled “MOM” on a painted plaque in any shape you like.
Floral Art with Crepe or Fabric Flowers definitely say “Happy Mother’s Day MOM”:
- Handmade flowers bring texture and personality to any project. Create crepe or fabric flowers and arrange them on a wood plaque or canvas. Add a message using stickers, stencils, or die-cut lettering.
- Tip: Paint or sponge a white or other basic colour background on your canvas or plaque to add texture and let it dry properly before decorating.
This project works beautifully as wall art and allows you to mix colours and materials for a dimensional, artistic effect.
DIY Fashion T-Shirt for Mom – Easy and Fun
Create a one-of-a-kind T-shirt for Mom with just a few simple techniques. Start by using an iron-on transfer design – once applied, it’s ready to customise with fabric paint and embellishments. Alternatively, use a stencil to paint your design directly onto the shirt. For best results, use a light amount of paint on your brush or sponge to prevent it from bleeding under the stencil. Once the design is dry, you can enhance it with additional embellishments or outline it with a fabric marker for a clean, finished look.
Be sure to use fabric paint and fabric glue for durability. Some paints require heat-setting to make them washable, so always follow the instructions on the product packaging to ensure your design lasts.
Creative Ideas to Try:
- A custom T-shirt offers plenty of room for personal touches. Why not paint a simple “Best Mom Ever” message surrounded by hand-drawn hearts or flowers for a classic look. For something more modern, try a minimalist line-art design paired with a meaningful word like “Love,” “Mama,” or “Home.”
- If you’re crafting with kids, consider tracing their handprints in bright colours to create a playful and sentimental design. Another idea is to use a stencil to add a floral border along the neckline or sleeves for a subtle, stylish detail.
- For a more decorative approach, add small rhinestones, fabric appliqués, or even lace accents after painting. You could also create a “wash” or watercolour-style background using diluted fabric paint for a soft, artistic effect. If you prefer, you can spray some diluted fabric paint as your “wash” or background, let it dry and then use a stencil for your design.
With just a bit of creativity, a simple T-shirt becomes a wearable keepsake Mom will treasure.
If you have never painted or stencilled a t-shirt before, “no worries”. Visit our blog on how to paint a t-shirt, where you will find easy-to-follow ideas and instructions.
Enhance the T-Shirt design by:
- Adding rhinestones, sequins, or pearls to embellish clothing details; remember, the more embellishments you use, the more care you’ll have to use when washing the t-shirt. Hotfix rhinestones or regular rhinestones should be okay to wash in the machine (always wash hand-painted and embellished t-shirts inside out on a delicate cycle for best results).
- Outlining edges with fabric glitter markers for extra sparkle
- Allow the shirt to dry thoroughly, ideally up to 10 days for best results. Handwashing is recommended to preserve the design.
Handmade Mother’s Day Cards
- A handmade card adds a deeply personal touch to any gift. Kids can cut strips of scrap paper and glue them across the front of a card, trimming the edges straight or into fun shapes.
- Add a “MOM” sticker or die-cut centrepiece, then decorate with hearts or small embellishments. Inside, write a message freehand or use stickers or stencils, and consider adding a paper or washi tape border for a polished look.
- Pair the card with a gift or tuck a gift card inside for a thoughtful finishing touch.
- You can make a handmade envelope or use a spare envelope you have in your stash.
Personalised Accessories & Gifts
A decorated tote bag or cosmetic pouch makes a practical yet stylish gift Mom can use every day. Customise it with fabric paints, patches, or embellishments that reflect her personality – whether that’s soft florals, bold patterns, or a meaningful quote. Keep the design simple and cohesive for a polished look.
Handmade jewellery is another thoughtful option that’s always cherished. Even simple pieces can feel special when they’re made with care:
- A shell pendant or pair of earrings can be created using small or medium-sized decorative shells. Carefully drill a tiny hole into the shell, insert a jump ring (using pliers to open and close the ring), and slide a chain or cord through the ring for a necklace. For earrings, choose two similar pretty shells, attach a jump ring to each, and finish with earring hooks for a delicate, beach-inspired accessory.
- Charm bracelets are a fun and personal project, especially for younger makers. Combine beads and small charms that reflect Mom’s interests or favourite colours. Children can easily thread beads onto a thin elastic cord, then add a few meaningful charms to complete the piece.
- For young kids, parental supervision is recommended.
These accessories are simple to make, yet they carry a personal touch that turns them into lasting keepsakes.
Creative Ideas to Try
- You could personalise a tote with a handwritten-style message like “Mom’s Essentials” or “Love You Always,” paired with simple painted accents. Try using clear stamps or sponges to create repetitive patterns such as hearts, leaves, or abstract shapes.
- If you prefer to use a stencil for the message, choose whatever style of lettering you think is best.
- For jewellery, consider using birthstone-coloured beads to represent family members, or add initial charms for a more customised feel. Layering textures – like mixing matte beads with metallic charms – can also give your designs a more refined, boutique-style finish.
Small details make all the difference, and these handmade touches help transform everyday items into something truly meaningful.
Custom Home & Keepsake Projects – Decorative
- A personalised decorative mug is a simple yet meaningful gift that Mom can enjoy every day. Use a paint marker – such as an acrylic or oil-based paint pen – to add names, patterns, or a heartfelt message. Keep your design clean and intentional for the best results, and allow it to dry thoroughly before handling.
- To help your artwork last, seal the mug with a suitable product, such as a dishwasher-safe Mod Podge or another compatible sealant. If you plan to wash the mug by hand, sealing is especially important. Always follow the instructions on the product label for best results.
- Remember these are merely decorative craft project ideas.
- If the mug is intended for everyday use – such as drinking tea or coffee – it’s important to use the correct materials to ensure it’s both safe and durable. Standard craft paints and sealants are not recommended for surfaces that come into contact with food or drink.
- Instead, start with a plain, unglazed or unvarnished ceramic mug and use paints specifically designed for ceramics. These paints are formulated to be food-safe once properly cured. Follow the manufacturer’s instructions carefully, which typically involve baking the mug in the oven to set the design and make it washable.
- When decorating, avoid painting the inside of the mug or the rim where lips will touch. Keep your design on the exterior surface only. This ensures the mug remains safe to use while still allowing you to create a beautiful, personalised gift.
- You can also decorate a terracotta or plain plant pot using paints, patterns, or stencilled designs. Once complete, fill it with a real plant or faux flowers to create a charming, ready-to-display gift. As with the mug, sealing your design with a suitable sealant will help preserve the artwork – particularly if the pot may be exposed to moisture or occasional washing.
- Pressed flower art is a timeless and thoughtful gift for Mom. You can arrange real flowers and leaves – simply seal them first by lightly brushing or sponging on Mod Podge and allowing them to dry completely to help preserve their shape and colour. Alternatively, use pre-pressed flowers, which are widely available online or at certain craft stores, and carefully glue them onto a sturdy backing sized to fit a decorative frame. Leave space to add a stamped or stencilled message if you wish. If fresh or pressed flowers aren’t available, consider decoupaging a floral napkin design instead. Another option is to use waterslide paper – special printable sheets that allow you to transfer a floral image and message directly onto the glass of your frame for a polished, professional look (just be sure to follow the package instructions).
*Tip: You can make your own pressed flowers by placing fresh blooms between the pages of a heavy book you don’t need anymore and leaving them to dry. It’s an easy, low-cost way to prepare materials for future projects.
Stationery & Small Crafts
- Create personalised stationery using cardstock or linen paper sheets, stamps – clear or rubber stamps, stickers, and layered paper designs. This is a lovely gift for moms who enjoy writing or organising.
- Bookmarks are another simple but thoughtful idea. Use painted cardstock, stamps, and a central message. To protect it, self-adhesive laminating sheets are absolutely fine to use and give a clean, durable finish.
- Fridge Magnets: You can also use magnetic photo laminating pockets to turn a favourite picture into a fridge display – perfect for family or pet photos.
- Bangles: There are also plenty of small yet meaningful projects that can complement your gift.
- A painted wooden bangle, for example, can be a lovely wearable piece – make sure you choose the correct size before decorating. You can keep it simple with hand-painted designs or try a paint-pour dip technique for a more marbled effect (see our paint pouring blog for tips and instructions).
- Custom keyrings are another easy and personal gift idea.
- Use letter beads, charms, or small decorative elements to create something unique that Mom can carry with her every day.
- For a more personalised touch, try using a plastic locket-style keyring. Paint a simple background or frame on the insert, then add a small family photo, a picture of a beloved pet, or a decorated “MOM” design. Once everything is in place, carefully secure the backing of the plastic “locket” with suitable glue to keep the special insert protected and in place.
- Tip: Perhaps put a very small drop of clear glue at the back of the photo or design if you want it to stay in place. Also, see that you have an extra copy of the photo for your album. Just an idea.
- Gift Packaging & Finishing Touches:
- A handmade or hand-decorated papier-mache gift box adds a special touch to any present. Decorate the exterior to suit your theme, then line the inside with a paper doily or soft tissue for a polished finish. Fill it with chocolates, jewellery, or small keepsakes. If you plan to include food, be sure to leave the inside unpainted for safety.
- Thoughtful packaging can elevate even the simplest handmade gift. Try decorating a gift box with a border of washi tape and adding a “MOM” sticker to the lid. You could also stencil and paint a message such as “I Love You Mom” or “You Are the Best” for a more personalised touch. Alternatively, keep things elegant with a ready-made gift box – simply wrap it with a beautiful ribbon and finish it off with a bow for a classic presentation.
See the YouTube Videos below – Click the Links
HGTV: 9 DIY Mother’s Day Gift Ideas
Mother’s Day DIY Projects; Using Pretty Dried Flowers etc.
Mother’s Day Gift DIYs on a Budget.
Paper Daisies – You can use Crepe Paper too.
Kids DIY Gifts ideas for Mom.
Cricut Mother’s Day Mugs.
Mother’s Day Wood DIYs.
Mother’s Day and Grandma signs – Personalised Stencilled Gift Ideas.
Easy DIY Keychain Gifts for Mom.
Easy Wood Heart DIY Keychain for Mom.
Easy Plastic Heart DIY Keychain for Mom.
Easy Decoupage Cosmetic Bag or Tote with Napkins and Mod Podge.
Fabric Mod Podge Napkin Decoupage on t-shirts, totes, cosmetic bags, etc.
Make Note Cards and Envelopes for Mother’s Day with Mod Podge.
Make a DIY Fridge Magnet for Mom.
Beautiful Handmade Mother’s Day Cards for all Skill Levels.
Altered Papier Mache Boxes – DIY ideas.
Decorate a Pretty Gift Box for Mom. Easy for both adults and kids.
Make a Paper Flower Bouquet for Mom: with a Cricut or another similar machine.
Gilly Kube – Super colourful split canvas Dutch pour blow n kiss 💐Happy Mothers Day Pour
Make mom some Seashell Earrings
Paint Pour a Bangle for Mom for Mother’s Day
Paint a Bangle for Mom – Easy Doodle Design
Instagram Video: Make a beautiful Bookmark for Mom.
- Follow the above Instagram Video but add a heartfelt Sticker Message for Mom in the middle of the Bookmark with the flowers surrounding it. Just an idea.
TikTok Video: Make and decorate a Box with beautiful paper flowers.
- *TIP: *If you don’t have the exact brands of acrylic or chalk or watercolour paints mentioned in these videos, use similar paints you have in your stash. These are just DIY ideas. Use your own creativity.
These Mother’s Day DIY ideas are all about celebrating creativity and thoughtfulness. Whether simple or detailed, each project reflects time and care – something every mom will appreciate.
The beauty of handmade gifts lies in their uniqueness. With a few materials and your own creative touch, you can create something unique and special for mom to say “Happy Mother’s Day MOM”, that will be treasured for years to come.
Discover a world of creativity in our Craft Store, where you’ll find a variety of unique stencils and other fun craft accessories to inspire your next project. If you’re looking for more DIY ideas and instructions, be sure to browse through our other blog posts as well – you might discover other creative projects you’d llike to try. We also carry Jigsaw Puzzles and Diamond Painting Puzzles, handcrafted Canadian-made jewellery and other special gifts for Mom.